
Instagram Reels can look polished without an expensive camera or a desktop editing program. With InShot Video Editor, you can arrange clips, remove unwanted sections, add text, record a voice-over, adjust speed, insert transitions, and prepare a vertical video directly on your phone.
The key is not to use every effect in the app. A strong Reel needs a clear opening, clean cuts, readable captions, balanced audio, and the right export settings. This guide walks through the entire process, from planning the video to publishing it on Instagram.
InShot is available for Android and Apple devices. Its current store listings describe tools such as trimming, merging, speed control, keyframes, picture-in-picture, chroma key, auto captions, background removal, voice-over recording, and exports up to 4K at 60 frames per second. The official InShot website, Google Play listing, and Apple App Store listing provide the latest feature and compatibility details.
Quick answer: Open InShot, tap Video, create a new project, import your clips, set the canvas to 9:16, trim and arrange the footage, add text and audio, and export at 1080 × 1920 and 30 FPS. Then upload the finished file as an Instagram Reel and enable Instagram’s highest-quality upload option.
Table of Contents
What Is InShot Video Editor?
InShot is a mobile video and photo editing app. It is designed for quick, touch-based editing, so it suits people who create content without a computer. You can use it for Instagram Reels, YouTube Shorts, WhatsApp Status videos, product demonstrations, travel clips, tutorials, and photo slideshows.
The editing timeline is simple enough for a beginner, but the app also includes more advanced tools. Depending on your device, app version, and plan, you may see:
- Trim, split, crop, rotate, and merge tools
- Canvas and aspect-ratio controls
- Music, sound effects, extracted audio, and voice-over recording
- Text, stickers, and automatic captions
- Filters, colour adjustments, effects, and transitions
- Speed controls and speed curves
- Picture-in-picture layers
- Keyframe animation
- Chroma key and background removal
- Object tracking and video stabilisation
- Custom export resolution and frame rate
That combination makes InShot useful for fast social media editing. It also keeps the whole workflow on one device. You can record, edit, export, and upload without moving large files to a laptop.
Is InShot connected to Instagram?
No. InShot is a separate editing app. Its official app listing says it is not affiliated with or endorsed by Instagram or Meta. You create the video in InShot, save it to your device, and then publish it through Instagram.
What You Need Before Creating a Reel
A few minutes of preparation can save much more time during editing.
1. A simple idea
Write the Reel’s purpose in one sentence. For example:
- Show three features of a new phone accessory.
- Explain one useful Excel shortcut.
- Share a before-and-after room makeover.
- Turn five travel clips into a short montage.
- Answer one common customer question.
If the idea cannot be stated clearly, the video may contain too many messages.
2. A hook
The first moment should tell viewers why they should continue. Start with the result, a question, a surprising detail, or a clear promise.
Examples include:
- “Your Reels look blurry because of this setting.”
- “Here is the fastest way to clean up a product video.”
- “Three editing mistakes new creators make.”
- “Watch this plain clip become a polished Reel.”
Avoid a long logo animation or a slow introduction. The viewer should understand the subject immediately.
3. Vertical source clips
Record vertically whenever possible. A vertical clip fills a Reel’s screen and needs less cropping. Clean the camera lens, use good light, keep the phone steady, and record a few seconds before and after the main action. Those extra seconds give you room to trim.
4. A basic shot list
A short tutorial may need only five shots:
- The result or hook
- The starting point
- The first action
- The second action
- The finished result and call to action
Shoot close-ups as well as wider views. The change in framing gives you natural visual variety.
5. Enough storage and battery
Video projects can consume several gigabytes. Keep space available for source clips, preview files, and the final export. Save important original footage somewhere safe before making major edits.
Best InShot Settings for Instagram Reels
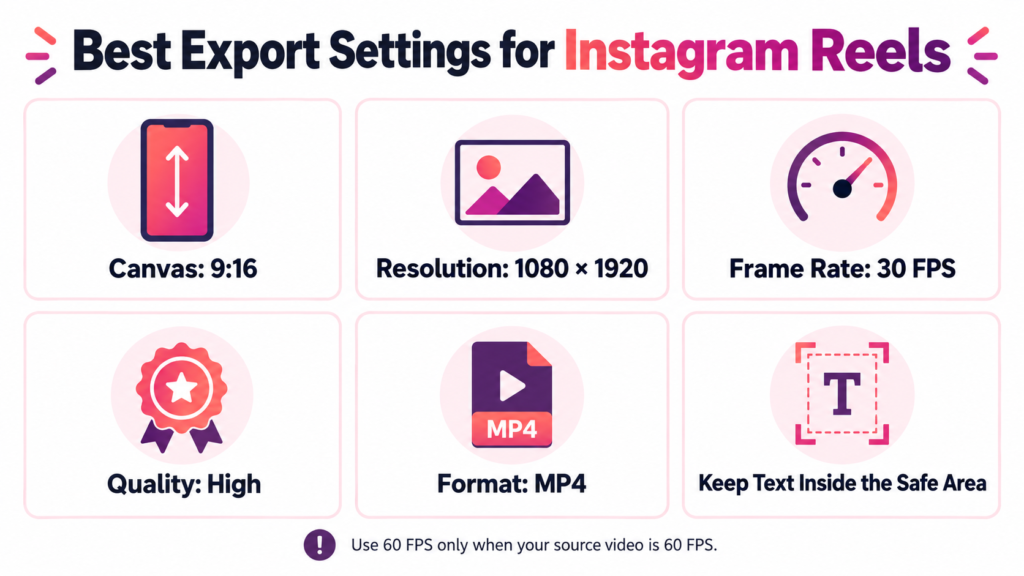
Use these settings as a reliable starting point. They preserve good quality without creating an unnecessarily large file.
| Setting | Recommended choice | Why it helps |
|---|---|---|
| Canvas ratio | 9:16 | Fills a vertical phone screen |
| Resolution | 1080 × 1920 | Standard Full HD vertical output |
| Frame rate | 30 FPS | Suitable for most recorded and talking-head videos |
| Higher frame rate | 60 FPS only when the source is 60 FPS | Helps motion remain smooth without inventing extra detail |
| Export quality | High | Reduces avoidable compression before upload |
| File format | MP4 | Widely compatible with mobile and social apps |
| Text placement | Inside the central safe area | Helps prevent interface buttons and captions from covering words |
Instagram accepts more than one video shape, but 9:16 is the practical choice for a full-screen Reel. The platform’s published Reel requirements include a minimum frame rate of 30 FPS and a minimum resolution of 720 pixels. Its Reel size and aspect-ratio help page contains the latest platform requirements.
Should you export a Reel in 4K?
InShot can support 4K and 60 FPS export on compatible devices, according to its official app listings. That does not mean every Reel needs those settings.
For most Instagram content, 1080 × 1920 is the better balance. It exports faster, takes less storage, and is easier to upload. A 4K export cannot restore detail that was absent from the original recording. Instagram may also compress the uploaded file.
Use 4K only when your original footage is genuinely 4K and you have a clear reason to preserve the larger master file. You can keep that master separately and upload a 1080p version to Instagram.
Should you choose 30 FPS or 60 FPS?
Match the export to the way you recorded the clips.
- Export at 30 FPS when most source footage was recorded at 30 FPS.
- Consider 60 FPS for sport, fast movement, or slow-motion footage recorded at 60 FPS.
- Do not export a 30 FPS recording at 60 FPS simply because the number is higher. It increases the file size without creating genuine new motion detail.
How to Create an Instagram Reel in InShot: Step by Step
The names and positions of controls can change slightly between Android, iPhone, and app updates. The editing process remains broadly the same.
Step 1: Plan the Reel before opening InShot
Choose one topic and one main action you want the viewer to take. The action might be saving the post, following your account, visiting a link, commenting, or trying the tip.
A simple Reel structure is:
- Hook: State the problem or show the result.
- Value: Demonstrate the steps, evidence, or transformation.
- Payoff: Reveal the final result or summary.
- Call to action: Tell the viewer what to do next.
You do not need a full screenplay. A few lines in your notes app are enough.
Step 2: Record clips vertically
Hold the phone upright and use the rear camera when practical. Record in a quiet place if speech matters. Face a window or another soft light source. Avoid placing a bright window directly behind the subject unless you want a silhouette.
Record several short takes instead of one very long clip. Short clips are easier to arrange and replace. Leave brief pauses between sentences if you plan to cut a talking-head video.
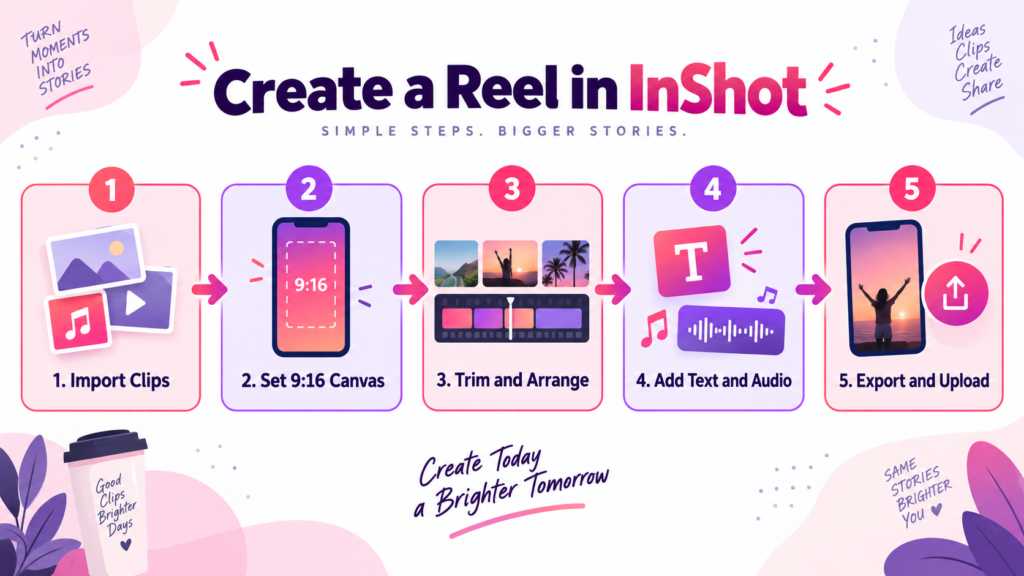
Step 3: Start a new video project
Open InShot and tap Video, followed by New or the new-project control. Allow access only to the photos and videos required for the project when your phone offers that option.
Select the source clips in the order you want to use them. You can change the order later. Tap the confirmation mark to open the timeline.
Step 4: Set the canvas to 9:16
Open Canvas, Ratio, or the equivalent aspect-ratio tool. Select 9:16.
If a horizontal clip does not fill the frame, choose one of these approaches:
- Enlarge and crop it to fill the vertical canvas.
- Keep the complete clip and add a blurred or coloured background.
- Place the clip in a designed layout with text above or below it.
- Use picture-in-picture to combine it with another vertical visual.
Do not stretch the video. Stretching changes the subject’s natural proportions.
Step 5: Arrange the clips
Press and hold a clip in the timeline, then drag it to a new position. Put the strongest visual or sentence first.
Watch the rough sequence without adding effects. Ask three questions:
- Does the subject become clear immediately?
- Does every clip help the story?
- Can any section be shorter?
Remove repetition before polishing the project.
Step 6: Trim, split, and delete unwanted footage
Select a clip and drag its ends inward to remove dead time. Use Split when you need to cut in the middle of a clip.
A clean cutting process is:
- Move the playhead to the start of the unwanted section.
- Tap Split.
- Move the playhead to the end of that section.
- Tap Split again.
- Select the separated piece and tap Delete.
For spoken videos, cut long breaths and empty pauses, but keep the result natural. If every gap is removed, the voice can sound rushed.
Step 7: Crop and straighten each shot
Check that the main subject remains visible after changing to a vertical canvas. Reposition each clip when needed. Keep faces, products, and important actions away from the extreme edges.
Instagram places interface elements over a Reel. These can include the account name, caption preview, audio information, and action buttons. Keep important words and graphics in the central part of the frame. Preview the cover separately because the profile grid may crop it differently.
Step 8: Adjust speed when it improves the story
Use Speed to shorten repetitive actions, create a time-lapse feel, or slow down a key moment. InShot’s current listings describe standard speed control and speed-ramping tools.
Useful examples include:
- Speed up a long packing, drawing, cooking, or setup process.
- Slow down the final reveal.
- Use a gentle speed curve to connect movement with a music beat.
Avoid changing the speed of speech unless the result still sounds natural. Major speed changes can also affect audio timing.
Step 9: Add transitions sparingly
Tap the transition control between two clips. A simple dissolve, fade, or movement transition can smooth a change in time or location.
Most cuts do not need a special transition. Straight cuts often feel faster and cleaner. Reserve noticeable effects for a deliberate transformation, beat change, or scene shift. Keeping transitions consistent also makes the Reel look more professional.
Step 10: Add music, sound effects, or a voice-over
Open Music or Audio. Depending on your version, you may be able to choose an InShot track, import permitted music, extract audio from a video, add a sound effect, or record a voice-over.
Set speech first. Then lower the background music until every word is easy to understand. Check the video with earphones and through the phone speaker because the mix can sound different on each.
For a voice-over, finish the main cuts before recording. If you record first and later remove several video sections, the narration may no longer match the pictures.
Step 11: Add text and captions
Use Text for the hook, short labels, and the final call to action. Use Captions or Auto Captions when it is available and you want spoken words transcribed. InShot’s official website says its Auto Captions tool can generate and edit captions in multiple languages.
Keep captions easy to scan:
- Use a large, simple font.
- Choose strong contrast between the text and background.
- Limit each text block to a few words or a short sentence.
- Break long speech into smaller caption groups.
- Keep text away from the bottom and right edges.
- Use the same font and colours throughout the Reel.
- Proofread every automatic caption before exporting.
Automatic transcription can misread names, brand terms, accents, and mixed-language speech. Review Hindi-English or other multilingual captions especially carefully.
Step 12: Improve colour and brightness
Open Filter and then use Adjust or similar manual controls. Correct exposure, contrast, saturation, warmth, highlights, and shadows with small changes.
Try to make neighbouring clips feel consistent. A bright clip followed by a very dark clip can distract the viewer. Avoid pushing saturation and sharpness so far that skin, food, or products look unnatural.
Step 13: Add optional layers and movement
Once the basic edit works, consider one advanced tool:
- Use Picture-in-Picture to show a screen recording above a talking-head clip.
- Use Keyframes to move or resize a label over time.
- Use Tracking to make text follow an object.
- Use Chroma Key for properly recorded green-screen footage.
- Use Background Removal to separate a subject from a simple background.
- Use Stabilise when a handheld clip has distracting movement and the feature is available.
These tools should support the message. Too many moving layers can make a short Reel difficult to follow.
Step 14: Build a strong ending
End as soon as the promise is fulfilled. Then add one short call to action.
Examples include:
- “Save this for your next edit.”
- “Which step will you try first?”
- “Follow for more mobile editing tips.”
- “See the full tool guide on Digital Discite.”
Do not stack several requests in the same ending. One clear action is easier to understand.
Step 15: Preview the complete Reel
Watch the entire video at least twice.
During the first pass, focus on the story and pacing. During the second, check technical details:
- Spelling and caption timing
- Text placement
- Music and voice levels
- Accidental blank frames
- Abrupt cuts
- Repeated clips
- Colour differences
- The first and final frame
Also watch once with the sound muted. The main idea should still be understandable from the visuals and captions.
Step 16: Export from InShot
Tap Save or the export icon. Choose:
- Resolution: 1080p
- Frame rate: 30 FPS for most projects
- Quality: High
- Format: MP4, when a format option appears
Choose 60 FPS only when the original footage and the project genuinely benefit from it. Keep InShot open during export. Avoid locking the phone or switching between demanding apps until the file is saved.
Play the exported video from your gallery before uploading it. This confirms that the file, sound, captions, and timing are correct.
Step 17: Upload the video to Instagram
Open Instagram, create a new Reel, and select the exported video. Then:
- Check the crop and full-screen preview.
- Add licensed Instagram audio if you intentionally left music out of InShot.
- Choose a clear cover image.
- Write a useful caption with the main topic near the beginning.
- Add relevant tags, a location, or a collaborator only when they genuinely apply.
- Add alt text or accessibility information if Instagram presents the option.
- Turn on Upload at highest quality in Instagram’s media-quality settings.
- Review the final preview and publish.
Instagram changes its menus and Reel length options over time. Check the current composer on your account instead of trimming a finished project to an old limit found in another tutorial.
How to Create an Instagram Reel from Photos in InShot
You do not need video clips to make a Reel. InShot can turn a set of photos into a vertical slideshow.
Step-by-step photo Reel workflow
- Open Video and start a new project.
- Select the photos in the required order.
- Set the canvas to 9:16.
- Adjust how long each image remains on screen.
- Crop or reposition each photo for the vertical frame.
- Add subtle transitions between images.
- Add short labels or captions.
- Add music or leave space for Instagram audio.
- Preview the pacing.
- Export at 1080p and 30 FPS.
Match photo changes to the rhythm when using music. Do not make every image change too quickly. Viewers need enough time to understand faces, text, and details.
For before-and-after content, hold the “before” image long enough to register. Then use a clean cut, swipe, or reveal to show the result.
How to Add Trending Audio to an InShot Reel
There are two sensible workflows.
Option 1: Add audio inside InShot
Use this method when you own the audio, have a suitable licence, or use music made available for that purpose inside InShot. It gives you precise control over cuts and beat timing.
Option 2: Add the audio inside Instagram
This is often the easier approach for a currently trending Reel sound.
- Edit the visuals in InShot.
- Keep the original voice or export without background music.
- Upload the video to Instagram.
- Choose the sound from Instagram’s available audio library.
- Select the relevant section.
- Lower the music if the Reel contains speech.
Audio availability and permitted uses can vary by country, account type, and rights agreement. Business accounts may see a different music selection. For commercial content, use music you created, properly licensed material, or audio that your account is permitted to use. Do not download another creator’s Reel simply to extract copyrighted music.
Best Editing Style for Different Types of Reels
| Reel type | Useful InShot tools | Editing approach |
|---|---|---|
| Talking-head tip | Split, captions, PIP, voice enhance | Remove empty pauses, add readable captions, and show examples above the speaker |
| Product demonstration | Trim, speed, text, keyframes | Start with the result, show close-ups, and label the main benefit |
| Tutorial | Text, screen recording, PIP, voice-over | Present one step at a time and keep labels consistent |
| Travel montage | Music, colour adjustment, speed ramp, transitions | Use varied shots and cut to rhythm without overusing effects |
| Before and after | Split, transition, freeze frame | Make the contrast obvious and hold both states long enough to compare |
| Photo slideshow | Canvas, duration, transitions, music | Use 9:16, maintain a steady pace, and avoid excessive zoom movement |
| Customer testimonial | Trim, captions, logo or text overlay | Keep the speaker natural and highlight only the strongest sentence |
Useful Advanced InShot Tools for Reels
Auto Captions
Automatic captions save time and improve accessibility. They also help people understand a Reel when their sound is off. Always correct transcription errors and punctuation manually.
Keyframes
A keyframe stores an element’s position, size, rotation, or another property at a particular moment. Add one keyframe, move forward in the timeline, and change the element. InShot creates movement between the two states.
Use keyframes for a gentle zoom, a moving arrow, or a label that follows the subject. Keep the movement smooth and purposeful.
Picture-in-Picture
PIP places one image or video above another. It is useful for reactions, demonstrations, comparisons, screen recordings, and before-and-after layouts.
Chroma Key
Chroma key removes a selected colour, usually a green background. The result is best when the original background has even light and the subject is not wearing the same colour.
Speed Curve
Speed curves let a clip accelerate and slow down within the same shot. They work well for movement, reveals, and beat-based edits. Apply them sparingly so viewers can still understand the action.
InShot Free vs InShot Pro
You can complete many basic Reel edits with the free version. Paid features and available offers can vary by device, country, and app version.
| Area | Free version | InShot Pro |
|---|---|---|
| Basic cutting and arranging | Available | Available |
| Text, music, and basic effects | Many options available | Full paid library included |
| Advertising | May appear | Removed |
| Watermark | May appear; legitimate removal options can vary | Removed automatically according to the App Store listing |
| Premium filters, transitions, and assets | Some are locked | Included while entitlement is active |
| Best for | Occasional creators and beginners | Frequent creators who need the full library and faster workflow |
Do not rely on an old price mentioned in a blog post. Open the purchase screen on your device to see the current local price, billing period, trial terms, and cancellation details.
If the free version offers a legitimate in-app option to remove its watermark for a project, follow that prompt. Do not use third-party watermark-removal sites or crop away important parts of the vertical frame.
How to Keep Instagram Reels from Looking Blurry
Start with clean source footage
Export settings cannot repair severe blur, poor focus, digital zoom, or weak lighting. Use the highest practical camera quality and avoid sending clips through messaging apps before editing because those apps may compress them.
Use the correct vertical canvas
A 9:16 project at 1080 × 1920 avoids unnecessary resizing and black bars. Recheck every horizontal clip after setting the canvas.
Avoid repeated exports
Each compression cycle can reduce quality. Edit from the original clips and export the final project once. Do not export, re-import, edit, and export again unless necessary.
Match the frame rate
Keep 30 FPS footage at 30 FPS. Preserve 60 FPS only when the source and the intended motion justify it.
Select high export quality
Choose the high-quality option in InShot. Then watch the saved file in your gallery. If it already looks blurry there, the issue happened before Instagram received it.
Enable Instagram’s highest-quality upload setting
In Instagram, open the settings area for media quality and enable Upload at highest quality. The exact menu path can change between app versions.
Use a reliable connection
Upload over a stable network and keep Instagram active until the upload completes. Give the platform time to finish processing before judging the final quality.
Common InShot Reel Mistakes to Avoid
Using a long introduction
Start with the result or benefit. A title card that delays the useful content can lose attention.
Placing text under Instagram controls
Keep important words away from the top, bottom, and right edges. Check the Reel preview before publishing.
Adding too many effects
Transitions, stickers, zooms, and animated text compete for attention. Choose a small visual system and repeat it.
Making captions too small
Your video will be viewed on phones of different sizes. Large text and strong contrast are safer than decorative fonts.
Letting music cover the voice
Reduce music during speech. Listen through both earphones and the phone speaker.
Using copyrighted audio without permission
A song being easy to find online does not mean it is cleared for your use. Use licensed audio and follow the rules that apply to your account and content.
Exporting at the wrong ratio
A square or horizontal project can leave borders or require aggressive cropping. Set 9:16 near the start of the edit.
Exporting 30 FPS footage at 60 FPS
This makes a larger file but does not create the missing motion information.
Deleting the project too soon
Keep the InShot draft and original clips until the Reel has uploaded correctly. A project may depend on media stored on your phone, so moving or deleting source files can cause problems.
Troubleshooting InShot and Instagram Reel Problems
The Reel has black bars
Open the project and confirm that the canvas is 9:16. Enlarge the clip, use a blurred background, or redesign the frame. Do not stretch it.
Instagram crops the text
Move captions and labels toward the centre. Also check the cover separately because the grid preview and full Reel can show different crops.
The export is blurry
Check the original footage, canvas size, and export resolution. Export at 1080p with high quality. Avoid enlarging a low-resolution clip.
The audio is out of sync
Return to the last point where the audio matched. Lock the picture edit before recording the final voice-over. Check whether a speed change or deleted video section shifted the sound.
Export stops or the app closes
Free storage, close other demanding apps, restart the phone, and try again. A project with many effects, PIP layers, high-resolution clips, or a high frame rate needs more memory and processing power.
The watermark appears
Use only the removal choices presented by InShot, or use InShot Pro if it makes sense for your workflow. The App Store listing says Pro removes the watermark and advertisements automatically.
The uploaded video looks worse than the gallery version
Confirm that Instagram’s highest-quality upload option is enabled. Upload the original InShot export rather than a copy sent through a messaging app. Use a stable connection and wait for processing to finish.
Is InShot Safe to Use?
Install InShot only from its official website link or your device’s recognised app store. Review the permissions before granting access. When your phone allows selected-media access, share only the clips needed for the project.
App privacy practices and disclosures can change. The current Google Play listing includes a Data Safety section, while Apple’s listing includes App Privacy information. Review those store disclosures and InShot’s privacy policy before using personal, client, or confidential footage.
InShot Video Editor: Pros and Limitations
Advantages
- Easy to learn on a phone
- Strong tools for short vertical content
- Quick trimming, text, audio, and caption workflow
- Advanced options such as PIP, keyframes, tracking, and chroma key
- Custom output settings, including high-resolution export on compatible devices
- Suitable for both videos and photo Reels
Limitations
- Ads and locked assets can interrupt the free workflow
- Free exports may include branding depending on the version or option selected
- Complex projects can be harder to manage on a small screen
- Long projects and many layers can strain older phones
- Features and menu names can differ by operating system and update
- Instagram still compresses uploaded video
Frequently Asked Questions
Is InShot Video Editor free?
InShot can be downloaded and used for many basic edits at no initial cost. It also contains advertisements, in-app purchases, and Pro plans. The exact free tools and purchase offers can vary by platform and region.
Can I create an Instagram Reel in InShot?
Yes. Create a video project, use a 9:16 canvas, edit the footage, export it to your gallery, and upload the saved file as a Reel in Instagram.
What InShot ratio should I use for Instagram Reels?
Use 9:16 for a full-screen vertical Reel.
What resolution is best for Instagram Reels?
1080 × 1920 is a practical standard for vertical Full HD Reels. It offers good detail without the file size of 4K.
Should I export an Instagram Reel at 30 or 60 FPS?
Use 30 FPS for most projects and footage recorded at 30 FPS. Use 60 FPS when the source was recorded at 60 FPS and smooth motion is important.
Can InShot add automatic captions?
Yes, current InShot materials list Auto Captions. Availability can depend on the device, app version, language, region, or plan. Always proofread the generated text.
Can I make a Reel from photos?
Yes. Import photos into a video project, set the duration of each image, add transitions and audio, and export the slideshow as a vertical video.
Should I add trending music in InShot or Instagram?
For a sound that is currently available in Instagram, editing the visuals in InShot and adding the audio during Instagram upload is often simpler. Use only audio that you are allowed to use.
How do I remove the InShot watermark?
Use a legitimate removal option shown inside the app, when available, or choose a Pro plan. InShot’s Apple listing states that Pro removes watermarks and ads automatically.
Why does my Reel look blurry after upload?
Common causes include low-quality source clips, the wrong canvas size, repeated compression, a low export setting, and Instagram upload compression. Export at 1080p with high quality and enable Instagram’s highest-quality upload option.
Does InShot post directly to Instagram?
InShot can provide sharing options, but it remains a separate app. Saving the finished video to your gallery before uploading gives you a backup and lets you review the exact exported file.
How long should an Instagram Reel be?
Use the shortest length that explains the idea properly. Instagram changes upload limits and options over time, and they can vary by account or upload route. Check the current Reel composer before finalising a longer project.
Final Verdict
InShot Video Editor is a practical choice for people who want to create Instagram Reels entirely on a phone. Its basic timeline is approachable, while captions, PIP, keyframes, tracking, speed controls, and other tools leave room to create more advanced edits.
The best results still come from simple decisions. Record clear vertical footage. Start with a strong hook. Remove anything that does not help the story. Keep captions readable. Balance the audio. Export at 1080 × 1920 and 30 FPS for most projects. Then review the final file and upload it with Instagram’s highest-quality setting enabled.
For more useful websites and apps, explore our guide to the best tech tools. If you are preparing a custom Reel cover, use our image SEO optimization guide to name, compress, and describe the image correctly before publishing it on your website.
Disclosure: InShot and Instagram are trademarks of their respective owners. Digital Discite is not affiliated with InShot or Meta. Features, pricing, interface labels, and platform requirements can change; verify important details in the current app before publishing.